Shoebox float time again. I don't know how we will be able to top last year's Super Mario float!
Geeky Mom Extraordinaire
Saturday, April 16, 2016
Friday, October 23, 2015
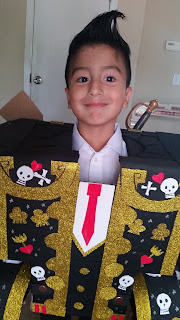
Manolo Sanchez Costume from The Book of Life
My 5 year old son begged to be Manolo for Halloween. I just wanted to buy him a matador costume but he insisted that he wanted "HUGE shoulders", so I looked on the web and found a couple of homemade costumes but no detailed instructions. I decided to take pics of all the steps while I put it together and hopefully make it easier for someone. Here it is, I am very proud of it and my kid approves!
 |
| Manolo-Sanchez-Costume.jpg |
Supplies:
A large box
Black Spray Paint (I used Krylon)
Black Foam Sheets (8)
White Foam Sheets (2)
Gold Foam Sheets (4)
Red Foam Sheet (1)
Lo Temp hot glue gun and glue sticks
Black and silver sharpie
4 inches of velcro
Metal circle brads (optional)
Total Price : about $30 with coupon. I bought a bunch of extra foam sheets in case I messed up somewhere, which i did, so I was glad to have extras.
- Cut the front and back pieces of the costume. The front is 3 pieces glued and taped together.
- Cut the arm attachments. I ended up not using the middle arm "box" because the costume was way to stiff for my little guy. You can go ahead and make it and see how it works for you.
- I forgot to take pics of the next cut out, but it's 2 rectangular pieces for the sides shown in the following pic.
- Tape all your pieces to another cardboard box and paint in an open well ventilated area. I just did it outside, it dried in 10 min.
- Once your paint is dry and the smell is gone, you can start working on attaching the neck foam. This is just to keep the neck area comfy. I cut out a piece of foam the shape of a toilet seat, glue the foam on the wrong side of the neck and cut slits on the open side so that you can glue it to the other side and covering the sharp cardboard edge. I used tacky glue which was a nightmare, so use your hot glue gun and you'll be done in no time.
- I started decorating the front of the costume with the gold and white foam. Then cut out the foam pieces by the top of the shoulders to work as "hinges" and keep the costume together like so:
- Glue the foam "hinges" to the top of the neck piece and then to the front and back pieces. I marked the glue areas in green.Wrong Side:
- Next we are going to work on the shoulders. First decorate the shoulder pieces with gold trim. Then with your glue gun, attach a piece of foam for the arch. make sure to leave the top side of the arch extra long since this is what is going to attach it to your costume body.Lay the main body flat and glue the shoulder pieces. Glued area is marked in green.
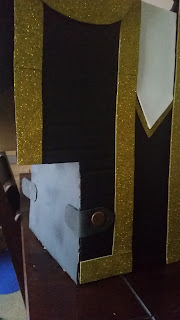
- Next, prop up your costume and glue the side pieces. At first I glued just one side and used brads on the other side to make a "door" that could be taken on and off to be able to get into the costume, however the costume was big enough to where my son could just slip it over his head and shoulders, so I ended up gluing both the sides to the costume.
- Next decorate the elbow and wrist pieces and then use foam for the arches and to attach the pieces together Now would be a great time to adjust your pieces, I had to cut mine smaller to make them more comfortable for my son.
- Next I reinforced the should "hinge" with a piece of foam on the underside. You can also use small pieces of cardboard to make it more structured.
- I cut out these tabs to attach the shoulder to the elbow pieces and the elbow piece to the wrist piece using brads. (I ended up doing something different and completely removing the elbow piece and not using the tabs/brads at all, but I figured it would be a good idea to show this way too)
- Time to try it on the model. It was way too stiff and he could barely move his arms.
- Like I mentioned, I scraped the elbows and used the tabs and made a fitted wrist attachment with a strip of foam and velcro glued to the wrong side to adjust around the arms.
- Next decorate the beastly thing. I used white foam and a black sharpie for the skulls. Gold foam for the buttons and the trims and badges. and red foam for the tie and other little decorations. A silver sharpie for drawing stars all over the thing. I used a bunch of scraps to make the guitar.
- So that the costume sits higher on your shoulders, I used all the foam i had left and made "blocks" which then I glued to the inside of the neck. Feel free to add more foam on the inside of the costume, especially around the high stress points like the "hinges" that are keeping the front and back piece attached to the neck piece.
- Add super strength hair gel, a white dress shirt, black leggings or skinny jeans, long pink socks and a pair of black shoes to complete the look .
Subscribe to:
Comments (Atom)


